This article will provide links and resources for those looking to integrate robotics into their process without having to go back to school or spend hours researching programming languages.
This article will present visual block-based programming. An interface that requires no coding experience, block-based programming lets users select blocks with commands more or less in common language to do just about anything that can be done in computer languages.
Two of the most known or used block-based programs are MIT’s Scratch and Google’s Blockly. Both user interfaces are free to use, have many tutorials online, and have started showing up in industrial robotics over the last five years or so.
This tool requires minimal experience and comes at a time when robotics are booming and robotic skills can be hard to find. Companies have used the open-source platforms developed by MIT and Google to create their own environments, but they are all relatively similar when it comes to programming.
Programming for Mechanical Engineers
Ladder logic may have been the first visual way to program industrial machines. If it has been a while since you have seen ladder logic, a refresher might remind you how we communicate with computers and boolean expressions. However, previous experience isn’t required.
Getting Started
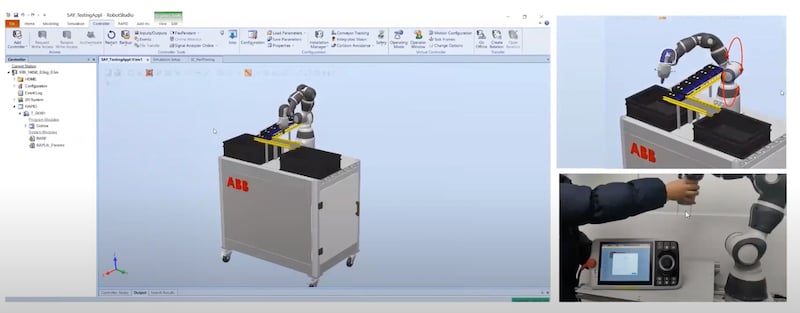
If you are thinking of using technology that uses preprogrammed blocks from libraries or platforms, check out a webinar from ABB. The link starts about nine minutes in, where they discuss installation and getting started with ABB Wizard.

A screenshot of the ABB Wizard interface.
Additionally, the license is free until the end of the year. While these programs are similar, changes in toolboxes, graphics, or blocks may cause a slight learning curve if you need to change platforms between learning and integrating.
Building Blocks
There are downloadable programs online, but Blockly offers interactive demos you can use right in your web browser. If you are new to programming in general, Blockly and online tutorials will be an easy way to get started.
Some downloads involve connecting with online repositories and other steps that might become inundating when trying to get started. You can go to the Blockly Developer Tools, Demos, and Blockly Introduction Video linked in this article to start exploring block-based programming.
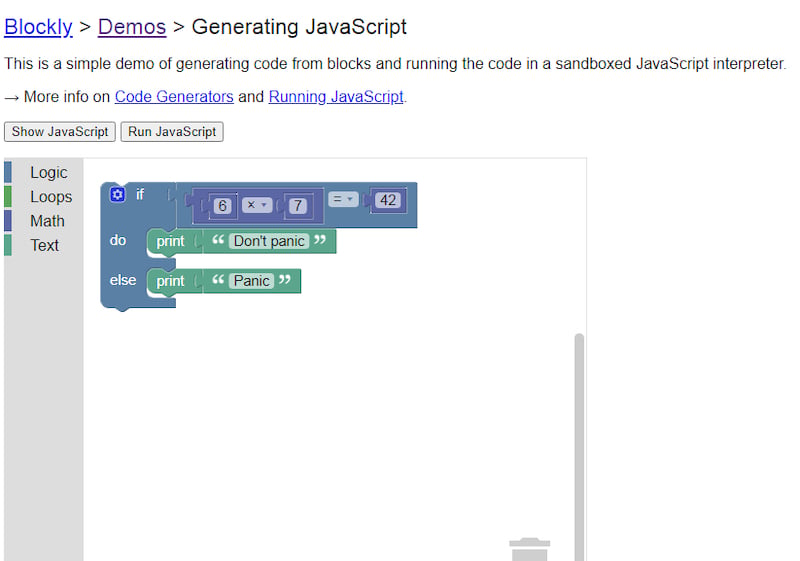
A valuable feature in many block-based programs is they can display the code presented in different languages as you build. If you check out Blockly Demo, you’ll see the JavaScript Generator pictured in Image 1. You can see this by selecting “Show JavaScript.” A dialogue box will pop up to show the code.

A screenshot showing the page mentioned above.
Before you get started with block-based programming, it might help to know what type of devices you plan to use, how you plan to use them, and what types of languages are associated with that application.
However, Blockly and Scratch work with some of the most used computer languages. Other programs either use Blockly or Scratch, have likely aligned the software with their device, or have a list of devices in which the program works.
In the demo presented in Image 1, The column – Logic, Loop, Math, Text – is the toolbox that will help you define and render your own blocks of code is easy to understand syntax.
You can select a block and drag it into the workspace to the right. To get rid of blocks, you can select and drag it to the trash can in the bottom right of your screen, or select it and use the delete or backspace key on your keyboard.
Many programs will begin with a START block. For robotic applications, it can be good practice to set a home LOCATION next. Also, take advantage of the ability to relabel blocks, inputs, and outputs. Renaming the Location 1 block to HOME will help reduce possible errors that can occur if multiple locations are associated with the same name.
Additionally, if the device you are programming is plugged into the computer you are programming with, it can see peripheral devices. For example, names like Motor_01, Motor_10, or Sensor_09 indicate what they are and on what port each is located. To communicate better, you might want to label them to communicate more specifically.
For example, Motor Right, Motor Turret, Sensor Camera Front. There is a video on how to get started in Robot Mesh Studio that goes through these steps on a VEX robot.
Some robotic arms can be programmed by selecting a MOVE block, but instead of entering an X, Y, Z coordinate, it is possible to move the robot to its next location.
Then, if an end-effector block is available, you can code a simple pick and place application with just a few blocks. This Pick and Place video shows an example.
This example from Ready Robotics is similar but using the company’s Task Canvas to set up a similar application with an industrial robot.
With robotics and the skills gap increasing, block-based programming might be the way to change and integrate technology to keep up with current demand.
Copyright Statement: The content of this website is intended for personal learning purposes only. If it infringes upon your copyright, please contact us for removal. Email: [email protected]
