Many PLC commands are well-known to programmers, including contacts, coils, timers, and counters. But a less-common instruction is the one-shot, capable of harnessing the incredible processing speeds in a CPU.
One-Shot Functions
In a previous article, I wrote about how to use timers in ladder logic. A typical next step is to discuss counters, being of a very similar function type and construction. However, before approaching the subject of counters, it is useful to investigate and understand the use of One-Shot instructions.
One-Shots are a very important part of a PLC program because of the incredible speeds that processors achieve in scanning their programs. Let’s talk about these processors for a moment. I just ran a test on my L16ER CompactLogix controller and the program scanned in eight microseconds. Our brains cannot fully comprehend this speed. We are not designed for it. To give us a better frame of reference, let’s measure the speed of something we can understand. When I cycle a bit on and off by hand in the logic and add 1 increment at every scan, I get 4486 counts even if I try to be as fast as possible.
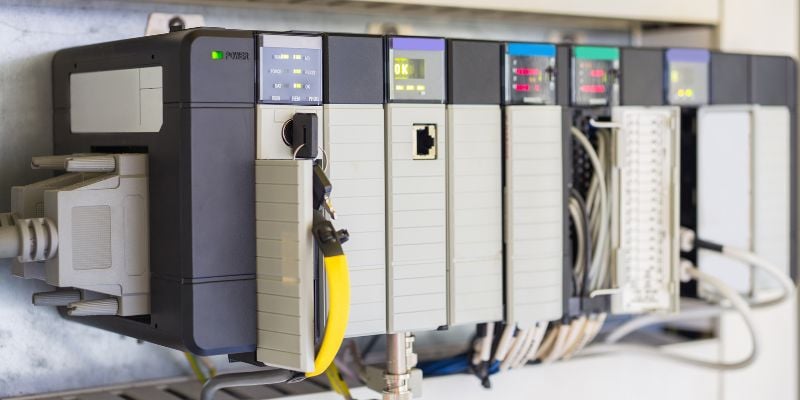
Figure 1. PLCs are the core of control systems, and understanding the logic is very important.
If we were trying to count how many times a photo-eye flagged for a passing unit using an incrementing math instruction, we’d have hundreds of thousands of counts even if it only flags for a second. What we need is an instruction that is able to activate only for a single scan of the controller when a condition goes true, and we have such an instruction available as the One-Shot
One-Shots come in a variety of forms, but with only a couple of different functions. The two different functions are triggered by a rising or falling edge. Alternatively, this can be known as a positive-going or a negative-going edge. Rockwell Automation’s Studio 5000 has a third option simply called a One-Shot and serves as a rising edge instruction in a very small package that fits in line with existing logic. This instruction is abbreviated ONS. In addition to the ONS, Studio 5000 also has traditional One-Shot Rising (OSR) and One-Shot Falling (OSF).
One-Shot Logic and Triggers
In Figure 2, you will see the Rising Edge One-Shot logic that I created in order to visualize the function operation. When the In bit is triggered, the first scan sets the Out bit and the Latch bit. During the next scan, with the Latch triggered, the PLC shuts off the Out bit. When the In bit drops out, the One-Shot resets.
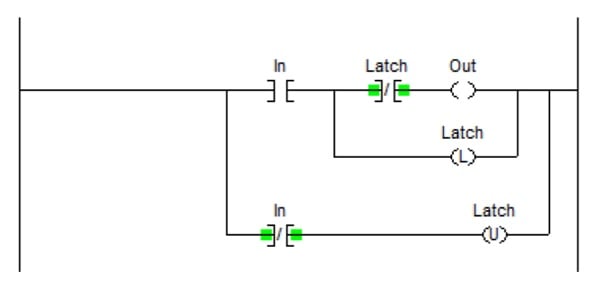
Figure 2. One-shot logic outside of the built-in function block.
A falling edge One-Shot would activate that latch when the In bit goes true but then activate the Out bit at the same time as it unlatches the Latch bit. Very similar logic, but slightly different use.
Using the ONS (One-Shot) Instruction
The ONS instruction that Allen Bradley uses is a very quick and clean system of adding a One-Shot at the end of a string of permissive instructions. This instruction is quick and clean but is only easily used in one spot in the program at a time.
In the logic below, I set up an ONS instruction to add a constant to a unit width. If the ONS was not in place, the value of 12 would be added to CurrentWidth many thousand times each time Sensors 1 and 2 were active.
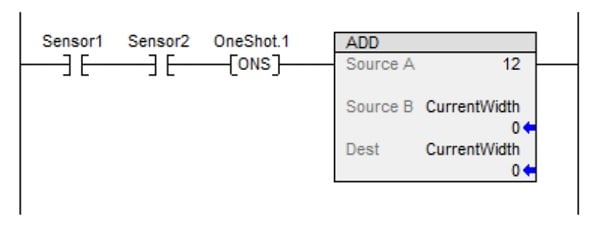
Figure 3. The standard one-shot instruction, as it appears in Rockwell’s Studio 5000 environment. Author’s image
Remember that the ONS function only acts on the rising edge of the inputs.
Using the OSR (One-Shot Rising) Instruction
In many years of programming, there are countless examples of ONS instructions. The OSR instruction experiences far less use due to its format as an output instruction instead of an input bit. Let’s examine a situation where this instruction would allow us to do something critically different than the ONS.
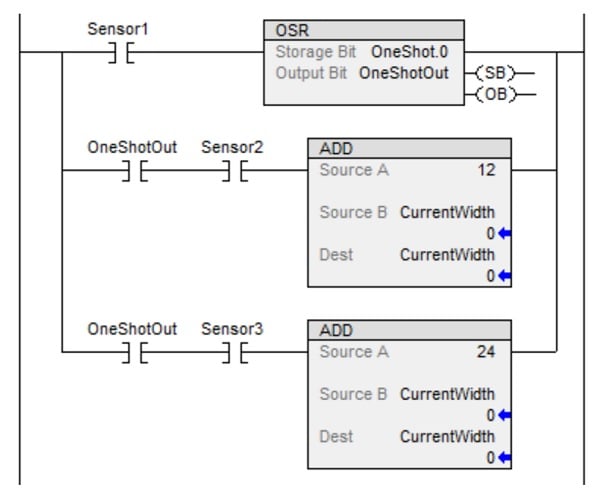
Figure 4. The one-shot rising instruction (OSR), as it appears in Rockwell’s Studio 5000 environment.
When Sensor1 activates, we need to add either 12 or 24 to the CurrentWidth. Before we add we need to look at the state of Sensors 2 and 3 to decide which number to add. In this case, the OneShotOut will trigger the correct one. If we wanted to use this OneShotOut in other places in the program, we could call it up from anywhere. A rare but useful tool to keep in your toolkit!
Using the OSF (One-Shot Falling) Instruction
The One-Shot Falling is a critically different instruction than the previous two. Here is where this can be used. I need to count how many sensors are triggered during a specific window of time. Knowing how many sensors are triggered will allow me to make my decision. If I use a rising edge to trigger my decision, I may not have time to ensure all the sensors have properly triggered.
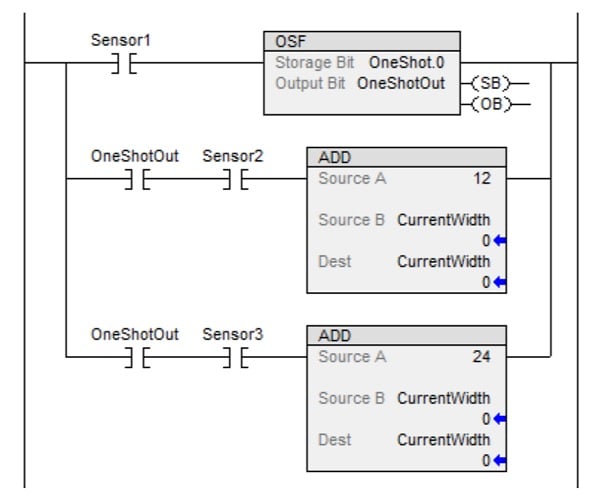
Figure 5. The one-shot falling instruction (OSF), as it appears in Rockwell’s Studio 5000 environment.
I can accomplish my goal by triggering an OSF instruction with the first sensor, immediately increasing the CurrentWidth value depending on how many sensors are active as the item leaves the first sensor. Just like the OSR instruction above, your OneShotOut would be usable anywhere in the program that can access the tag.
Be aware that in older versions of Rockwell software, like RSLogix5 and RSLogix500, you may find versions that do not have the ONS instruction and you are forced to use either the OSR or OSF.
Alternative Programming Environments
Other companies, such as Automation Direct, offer a similar function but very different appearance for the one-shot system. In the figure below, I’ve displayed Productivity’s four different One-Shot instructions as an illustration of how it might appear.
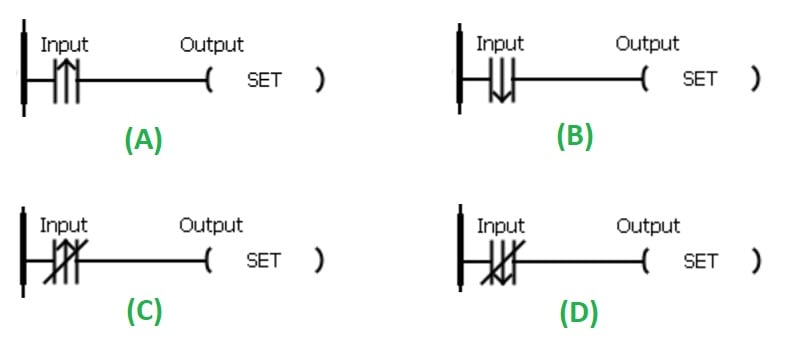
Figure 6. Alternative styles of one-shot functionality, in this case, Productivity Suite by Automation Direct.
Unlike Rockwell, Automation Direct sets up their One-Shots as Normally Open (Figure 6, (A) and (B)) and Normally Closed (Figure 6, (C) and (D)) input contacts, which are analogous to XIC and XIO instructions. You choose the state you want the instruction to trigger in and then decide if you want that trigger to be on the rising edge (Figure 6, (A) and (C)) or the falling edge (Figure 6, (B) and (D)).
With the instruction in place, you simply assign the tag (for example, input terminal) meant to trigger the One-Shot application. Examining these different systems is very useful in understanding the wide variety of contexts in which this same function might appear.
Summary
It is important to remember that your programming environment may be a little different from both of these. The most important thing to remember is how the two basic styles of One-Shots work. The rising edge triggers for one scan when the input becomes energized and the falling edge triggers for one scan when the input de-energizes.
Copyright Statement: The content of this website is intended for personal learning purposes only. If it infringes upon your copyright, please contact us for removal. Email: [email protected]
